2. Wallbox
This is a list of the currently known supported wallboxes. Below are the setup instructions for hardware and the EVCC configuration settings.
- Wallbe Eco
- Wallbe pre 2019 with Phoenix EV-CC-AC1-M3-CBC-RCM-ETH controllers
- OpenWB
- Any charger with Phoenix EM-CP-PP-ETH controllers
- Any charger with SimpleEVSE controllers connected via ModBus
- Any charger with SimpleEVSE controllers using SimpleEVSE-Wifi
- NRGKick chargers with Connect module
- go-eCharger
- KEBA KeContact P20/P30
- Mobile Charger Connect (Audi, Bentley, Porsche)
Wallbe chargers are supported out of the box. The Wallbe must be connected using Ethernet. If not configured, the default address 192.168.0.8:502 is used.
To allow controlling charge start/stop, the Wallbe physical configuration must be modified. This requires opening the Wallbe. Once opened, DIP 10 must be set to ON:
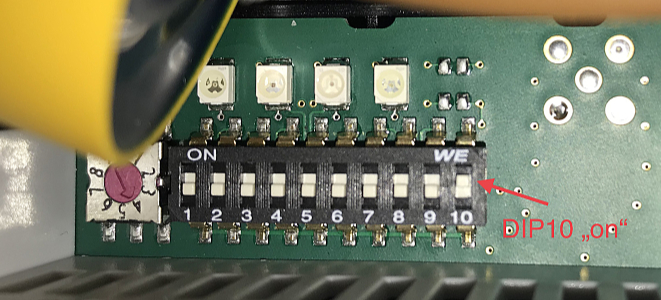
More information on interacting with Wallbe chargers can be found at GoingElectric. Use with care.
NOTE: The Wallbe products come in two flavors. Older models (2017 known to be "old", 2019 known to be "new") use the Phoenix EV-CC-AC1-M3-CBC-RCM controller. For such models make sure to set legacy: true. You can find you which one you have using MBMD:
mbmd read -a 192.168.0.8:502 -d 255 -t holding -e int 300 1Compare the value to what you see as Actual Charge Current Setting in the Wallbe web UI. If the numbers match, it's a Phoenix controller, if the reading is factor 10x the UI value then it's a Wallbe controller.
NOTE: Opening the wall box must only be done by certified professionals. The box must be disconnected from mains before opening.
Example configuration:
chargers:
- name: wallbe
  type: wallbe
uri: 192.168.0.8:502Example configuration:
chargers:
- name: wallbe
  type: wallbe
legacy: trueExample configuration:
chargers:
- name: openwb
  type: openwb
  status:
    # with openWB, charging status (A..F) this is split between "plugged" and "charging"
    # the openwb type combines both into status (charging=C, plugged=B, otherwise=A)
    type: openwb
    plugged:
      type: mqtt
      topic: openWB/lp/1/boolPlugStat
    charging:
      type: mqtt
      topic: openWB/lp/1/boolChargeStat
  enabled:
    type: mqtt
    topic: openWB/lp/1/ChargePointEnabled
    timeout: 30s
  enable:
    type: mqtt
    topic: openWB/set/lp1/ChargePointEnabled
    payload: ${enable:%d}
  maxcurrent:
    type: mqtt
topic: openWB/set/lp1/DirectChargeAmpsHardware setup:
DIP switch 10 needs to be "on", DIP switch 7 needs to be "off" in order to enable control
Example configuration:
chargers:
- name: phoenix
  type: phoenix-emcp
  uri: 192.168.0.4:23
id: 255 # only if different from default 180Example ModBus configuration if meter is directly connected:
chargers:
- name: phoenix
  type: phoenix-evcc
  id: 1
  device: /dev/ttyUSB0
  baudrate: 9600
  comset: "8N1"
Example ModBus configuration if meter is connected using RS485<->Ethernet adapter:
chargers:
- name: phoenix
  type: phoenix-evcc
  id: 1
uri: 192.168.0.4:23Example configuration:
chargers:
- name: simpleevse
  type: simpleevse
id: 1Example configuration:
chargers:
- name: evsewifi
  type: evsewifi
uri: 192.168.0.4Example configuration:
chargers:
- name: nrgkick
  type: nrgkick
uri: http://192.168.0.4Example configuration:
chargers:
- name: go
  type: go-e
uri: http://192.168.0.4Requires enabled UDP function with DIP switch 1.3 = ON, see installation manual.
NOTE: rfid tag and serial tag are optional.
RFID enables EVCC to start charging even if the Wallbox was not unlocked using the chip/card.
Serial enables EVCC to communicate with the Wallbox when run in Docker. UDP-Port 7090 must be added to the Docker port settings!
chargers:
- name: keba
  type: keba
  uri: 192.168.0.4
  serial: 12345678
  rfid:
tag: XXXXXXXX00000000NOTE: This charger does NOT support enabling or disabling charging. So the only useful modes are Sofort Laden and Min + PV!
Example configuration:
chargers:
- name: mcc
  type: mcc
  uri: 192.168.0.4
  password: homeuserpassword