| Abstract | Forum post introducing and explaining the purpose, syntax, and usage of a new script (InsertArg) for a VTT RPG site (roll20.net). |
| Audience | Existing site users with some technical ability. |
| Tone | Forum / Conversational |
InsertArg is a script that gives you a way to interact with information in a game and feed it to the chat and/or other scripts, or to build your own output on the fly. It can be a little meta, so let's start with an image. InsertArg is... a script preamp... a script siege engine... a socket set of interchangeable and extensible tools...
On a more concrete level, it's a way to extend other scripts, giving them functionality you might wish they had, and letting you virtually code in the chat interface. It solves many of the headaches of ad hoc necessity, such as knowing how many targets to target in a command line (do you write your macro for 4 targets, when you might only need to target 1 during the game?), or having to maintain multiple copies of a macro (one for straight usage, one for nested), or formatting particular character components. On top of this, it is, itself, extensible (more on that below).
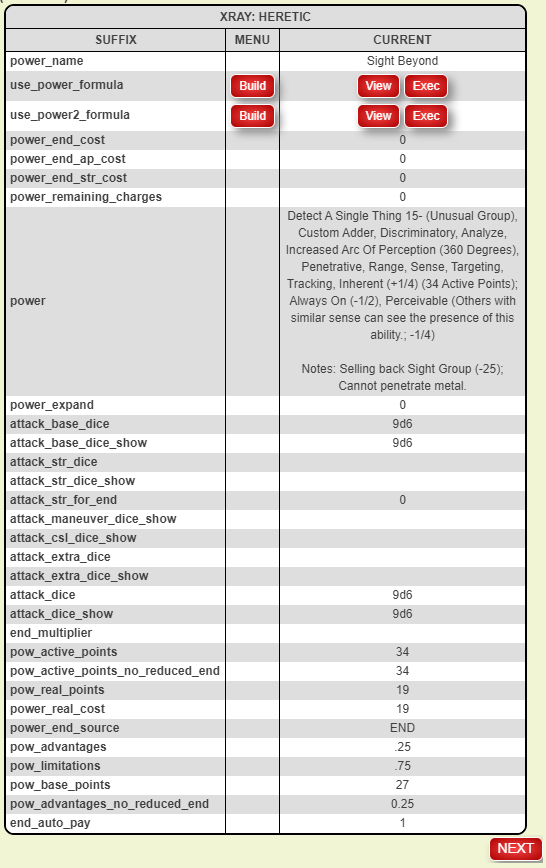
As you can see, it's also a menu builder, but that's perhaps the third or fourth coolest thing it does. It will also x-ray characters:
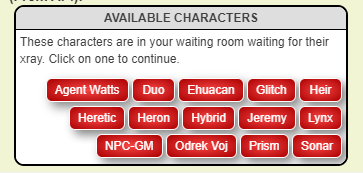
...and let you walk the sheet...
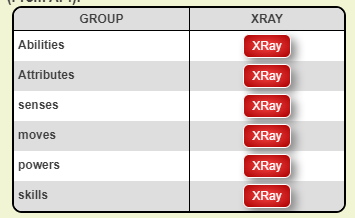
...drilling down on abilities, attributes, or repeating sections...
Here's how it works. InsertArg is an on-the-fly text-replacement and text-insertion script, giving you custom hooks and command-line functions for what to get, where to get it, how to format it, and where/how to output it. In other words, you can build and/or change custom command lines using built in functions in the InsertArg library, either building stand-alone commands or prefilling portions of calls to other commands. We'll break the command syntax down in a bit, but for now let's just start small:
!ia --whisper# --show#Because it is close to us
// whispers: Because it is close to us
But if you had a character named "Leroy", and Leroy had an ability named "Super Spell" that had an action that read:
!welikethemoon --why#show
...and you modified your call to InsertArg just slightly...
!ia --whisper#Leroy|Super Spell --show#Because it is close to us
...then the line that would reach the chat would be:
!welikethemoon --why#Because it is close to us
Leroy's original ability is unchanged, but we fed ad hoc insertions into the command line before it reached the chat. In this case, in the ability we used the hook of show as the marker for where to drop our replacement text. We could have used anything, but stayed with show since that was in our original example line (we'll get to what text can be used for hooks and built-in special hooks -- like "show" -- soon).
Finally, when you realize that the text we inserted ("Because it is close to us") could be derived at the time of running our call (via our internal function library), you begin to see how flexible and powerful InsertArg can be.
A call to insertarg begins with !ia, followed by arguments denoted by the double-hyphen.
The very first argument (called the mapArg), tells InsertArg what it's about to do, and where to find the information it needs. The mapArg can be one of these basic keywords:
whisper     ==>    sends output directly to chat as whisper if possible, or load/button if not
button      ==>    creates a button to execute the modified command line
load        ==>    writes the altered command line to the designated storage object (store argument; default: InsertArg ability)
menu        ==>    sends to chat as whispered menu
Others, like handout, log, help, and config are allowed but are used for internal house-keeping (like producing a config or help handout). More on those later.
The second half of the mapArg (following a hash) is the source to draw your initial command line from. For chat, whisper, button, and load, you can enter an ability or macro as follows:
--chat#Cake            ==>    if speaking as a player, this finds an ability on that character's sheet called 'Cake'
--chat#macro|orDeath   ==>    this finds a macro named 'orDeath'
--chat#Izzard|Cake     ==>    this finds an ability named 'Cake' on the character 'Izzard'
Generally in InsertArg, where a character is called for, you can use any of a character id, character name, or token id provided the token represents a character, and InsertArg will figure out who you're talking about.
If you do not specify a source for one of the four mapArg values mentioned (chat, whisper, button, load), your command line is prefilled with "show," giving you a hook you can later replace. Looking back to our first example, we replaced the hook "show" with "Because it is close to us".
Most of your arguments will take the form of --hook#value, where you want to replace or insert before/after the specified hook with the value you have retrieved. In this way, your hooks are fully customizable, and not limited to anything specified by the InsertArg script, itself.
// Izzard has an ability named 'Cake' that reads: It's more of a maneuver, really.
!ia --whisper#Izzard|Cake --more#less --really#if you know what I mean
// produces: It's less of a maneuver, if you know what I mean.
InsertArg defaults to replacing every instance of a hook with the specified value. Since hooks are processed left to right, they are chainable, and can work with what was left to them of the source command line after previous hook arguments have processed.
// Izzard has an ability named 'Cake' that reads: It's more of a maneuver, really.
!ia --whisper#Izzard|Cake --more#less --less#part
// produces: It's part of a maneuver, really.
Hook arguments can be anything you wish except for the following list of special arguments:
bg        ==>    base background color for buttons
css       ==>    free css input for styling buttons
store     ==>    where to drop the altered command line, if necessary (default: InsertArg)
cmd       ==>    a special hook that represents the entirety of the command line, as it stands when processed
In the case of bg, css, and store, these arguments will be processed before any hook argument, and will not be fed to the internal parser. The special argument cmd will be treated like any other hook, processed in its turn (left to right), except using the entirety of the command line at that point as the hook.
One last thing to understand before we get to the really good stuff (the internal library of functions available to you), and that's how to handle hooks so that you always know (or can imagine) the state of your command line at any given time.
As mentioned, InsertArg defaults to complete replacement of every instance of a hook found in the command line at the time of processing that hook. The entire hook is consumed and everything in your value is put in its place, and that happens everywhere we find that particular hook. There are special characters that can alter this behavior.
--^^hook#value    ==>    inserts value before hook, leaves hook in the command line
--hook^^#value    ==>    inserts value after hook, leaves hook in the command line
By not consuming the hook, you gain a way to make additions to your command line, but you also leave the hook to be reusable for future hook arguments. You'll see this more in examples, below, where we'll build a menu. Also, these before/after constructions, when paired with the special hook cmd (representing the entire command line) can be a way to prepend/append info to your command line.
This one is a bit more esoteric, and it might make more sense after you read about the internal functions to understand the sort of things you can return. Again, the typical behavior is that every instance of a hook receives all of the value you have entered (or derived) as the replacement. What if you want to instead spread the return over several instances of the hook, giving each an element from the returned value? Or what if you want to deliver all of the payload to the first hook and only the first hook, leaving other instances of the hook behind? For this you will want a lazy or a greedy hook.
--hook++#value        ==>    greedy hook; the first instance of the hook will get the value, leaving nothing for other instances of hook
--++hook|d#value      ==>    lazy hook; the value will be split on the delimiter (d),
                             with the first resulting element going to the first hook, the second to the second, etc
Lazy hooks that are not consumed before the list of returned values is spent remain in the command line. The pipe character (|) denotes the division of hook and delimiter for a lazy hook, but you may still have pipes in your hook and/or your delimiter. Your delimiter may only start with a pipe, however if it is only the pipe character (short of escaping; see note, below). Here are examples:
                      HOOK       DELIM
=============================================
--++hook|d            hook         d
--++hook||            hook         |
--++hook||d           hook|        d
--++hook||d|          hook|        d|
NOTE: The delimiter for a lazy hook can be escaped with paired ticks(``); this syntax is consistent throughout the core library of functions elsewhere delimiters are used.
The syntax for combining and greedy/lazy hooks is complementary, so you could have formations like this:
GREEDY INSERT AFTER
--hook^^++        ==OR==
\--hook++^^
GREEDY INSERT BEFORE
--^^hook++
LAZY INSERT AFTER
--++hook^^|d
LAZY INSERT BEFORE
--++^^hook|d     ==OR==
--^^++hook|d
The order of insertion position versus lazy/greedy does not matter. If you designate something as both lazy and greedy, lazy wins. If you designate something as inserting before and after, before wins.
Text replacement games are fun, and all, but the real magic of the script is in the library of internal functions you can run. The core library has functions that let you access game components through the chat command line, retrieving data and formatting it as you necessary (and you can add to these functions easily, if you have a need to fill -- more on that later). The functions are fed through a recursive process that detects functions in the core library, processes them out to text, and passes them either to a wrapping function (if we are in a recursion) or to the hook (once all internal functions have been resolved). For instance, getsections is a function that will return the repeating sections for a character provided you supply a valid character identifier (name, id, or token id):
!ia --whisper --show#getsections{{!!c#Heretic !!d#`, `}}
// returns: senses, moves, powers, skills
...but if you wanted to be able to call the same line from several places, or you wanted to give it to one of your players so they could use it without having to edit it, you could instead write the line with the getme function in place of your character's name:
!ia --whisper --show#getsections{{!!c#getme{{}} !!d#`, `}}
// returns: senses, moves, powers, skills
Functions are recognized by their name followed by double curly brackets (opening and closing) that enclose any arguments to the function (i.e., getsections{{ ... }}). Arguments are denoted using double exclamation marks followed by the argument key, a hash, and then the argument value (i.e., !!c#Leroy). Arguments that do not receive a value are assigned the boolean value true. Certain arguments take special syntax for their values. This syntax can be found in the help for each function.
The easiest way to access the help is to type !ia into chat to get the IA Config screen. The screen will list all of the functions you have installed and available to you. Each will have a help button if the author has included such information (all of the functions in the core library come with help). You will also see on the IA Config screen the option to make the same information into a help handout in your game, if that is easier for you. This can be a helpful resource to have open while you put together your InsertArg calls.
Also on the IA Config screen, you'll see the option to turn logging on or off. The recursive descent parsing engine built into IA is setup to output what every function is receiving and handing off along the way, writing this information to your log. This can be a helpful tool if your command line is not producing the result you think it should. By examining what each function handed off to the next, you can see where in the chain you might have an error.
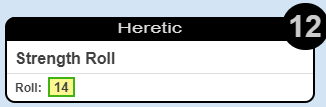
Let's say that for my character, Heretic (Hero System 6E), I wanted to build a query of nicely formatted stat choices that trigger the roll template if I select that stat. The character sheet I'm using has various attributes for these stats, but the ones I'm interested in are named str_roll_formula, dex_roll_formula, con_roll_formula, etc. Each one has a roll template that looks like:
&{template:hero6template} {{charname=@{character_name}}} {{action=Strength Roll}} {{roll=[[3d6]]}} {{target=12}}
The templates contain characters (like a right brace) that can break a query, and replacing them can be a pain. You obviously can't store the attribute values for these roll formulas with their characters replaced, but we can use InsertArg to give us the text we need:
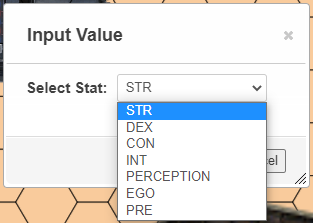
!ia --load --show#getattrs{{!!c#getme{{}} !!op#q !!f#x !!p#Select Stat !!frmt#fr#_roll_formula#``|uc !!efrmt#rslv#character_name#Heretic|n}}
Here we are loading (into our default ability, InsertArg), the result of a getattrs function call. It is going to output (op) a query (q), using the prompt (p) "Select Stat". I derive my list of attributes to include by filtering (f) on the attribute being executable (x).
NOTE: These are my only executable stats for this character sheet, but if there had been others I could have further filtered the list.
Since I didn't want to see choices of str_roll_formula and dex_roll_formula in the query, I perform a format (frmt) to do a find/replace (fr), looking for _roll_formula and replacing it with nothing (``). In the same format argument, I tell it to be uppercase (uc). Finally, I format the executable side (efrmt) to resolve (rslv) any instances of @{character_name} with Heretic. (Resolve is a special find/replace that wraps what you give it in @{} before searching.) Last, in that same efrmt argument I tell it to nest (n) the executable string, performing the HTML entity replacement. The end result is:
?{Select Stat|
STR,&{template:hero6template} {{charname=Heretic}} {{action=Strength Roll}} {{roll=[[3d6]]}} {{target=12}}|
DEX,&{template:hero6template} {{charname=Heretic}} {{action=Dexterity Roll}} {{roll=[[3d6]]}} {{target=13}}|
CON,&{template:hero6template} {{charname=Heretic}} {{action=Constitution Roll}} {{roll=[[3d6]]}} {{target=12}}|
INT,&{template:hero6template} {{charname=Heretic}} {{action=Intelligence Roll}} {{roll=[[3d6]]}} {{target=13}}|
PERCEPTION,&{template:hero6template} {{charname=Heretic}} {{action=Perception Roll}} {{roll=[[3d6]]}} {{target=13}} {{base=9}} {{stat=4}}|
EGO,&{template:hero6template} {{charname=Heretic}} {{action=Ego Roll}} {{roll=[[3d6]]}} {{target=14}}|
PRE,&{template:hero6template} {{charname=Heretic}} {{action=Presence Roll}} {{roll=[[3d6]]}} {{target=11}}}
Let's build a menu using the functions available to us and the mapArg menu. Menus can be added to the InsertArg engine (more on that in subsequent posts talking about how to code and expand InsertArg), but it ships with just one: the default menu. The default menu gives you an option for a title, a color, a fade value for an alternate color, and a single hook named row. It also comes with two row elements to choose from (row and elem), which you'll see in a moment. Menus can have any number of possible row types to choose from, so if you add a third-party menu, it will be up to the menu author to communicate your options to you.
When using a menu, your mapArg value is in the form of:
--menu#name|color|fade
If nothing is specified for these three options, the default menu (and its default options) will be loaded.
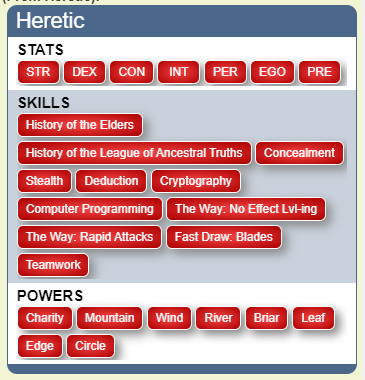
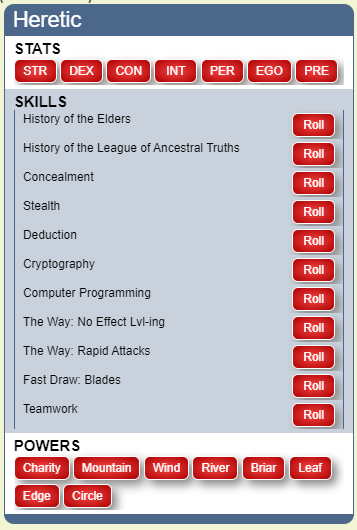
Here are a couple of options for how to construct the menu. This first option (for the same character, Heretic), uses only row types of row (no elem):
!ia
--menu
--title#getme{{!!r#n}}
--^^row#getrow{{!!t#STATS !!c#ffffff !!s#getattrs{{!!c#getme{{}} !!op#b !!f#f^#_roll_formula !!frmt#fr#_roll_formula#``|fr#ception#``|uc}}}}
--^^row#getrow{{!!t#SKILLS !!f#.7 !!s#getrepeating{{!!c#getme{{}} !!s#skills !!sfxn#skill_name !!sfxa#skill_roll_formula !!op#b !!f#x}}}}
--row#getrow{{!!t#POWERS !!c#ffffff !!s#getabils{{!!c#getme{{}} !!op#b !!f#^f#WayOf !!frmt#fr#WayOfThe#``|fr#WayOf#``}}}}
Future posts will get into breaking down the syntax. For now, here is the output of the above command:
Next, let's see how to use elem portions of a menu.
Note the middle row (SKILLS) in the above screenshot. I don't like the way the buttons look rather hodge-podge in this section, so let's try again with a row type of elem. elem output is intended for exterior labels with consistent button text. Here is the call, slightly changed:
!ia
--menu
--title#getme{{!!r#n}}
--^^row#getrow{{!!t#STATS !!c#ffffff !!s#getattrs{{!!c#getme{{}} !!op#b !!f#f^#_roll_formula !!frmt#fr#_roll_formula#``|fr#ception#``|uc}}}}
--^^row#getrow{{!!t#SKILLS !!f#.7 !!s#getrow{{!!r#elem !!t#SKILLS !!f#.7 !!s#getrepeating{{!!c#getme{{}} !!s#skills !!sfxn#skill_name !!sfxa#skill_roll_formula !!op#be !!rlbl#Roll !!f#x}}}}}}
--row#getrow{{!!t#POWERS !!c#ffffff !!s#getabils{{!!c#getme{{}} !!op#b !!f#^f#WayOf !!frmt#fr#WayOfThe#``|fr#WayOf#``}}}}
And, again, the output...
There is more to discuss about what the script can do, and I plan follow-on posts highlighting other features like how to extend the library of available functions, add on your own menus, or x-ray characters. Follow this thread for more information, and post any questions you have!