The goal of this tutorial is to understand the basics of Github Actions and get familiar with the concepts around it.
The first step in the process of creating our first CI/CD pipeline is to create a GitHub Workflow. Wait, what is a pipeline again, and what is a GitHub Workflow?
- A pipeline is a generic term referring to the entire automated process of software development
- whereas GitHub Workflow can be described as a set of instructions or a series of steps that automate processes in your software development projects on GitHub. These processes can include building your code, running tests, and deploying your application in the case of a pipeline (but you could also use GitHub workflows for other cases, like data backup, dependency update notifications, etc.).
Ok! Now let's create a GitHub Workflow in order to set our pipeline and automate the deployment of our application.
Open a terminal from the root of our project directory and create the following folder structure by running:
mkdir .github/
mkdir .github/workflows/
Navigate to the folder we just created:
cd .github/workflows/
Now we create a workflow inside the workflows folder:
For mac users, run this command:
touch pipeline.yml
and for Windows users:
echo "Your YAML content here" > pipeline.yml
The next step is to add the pipeline definition in the file we just created:
name: CI/CD Pipeline

on: push
jobs:
  hello-world:
    runs-on: ubuntu-latest
    steps:
      - name: Hello World step
        run: echo "Hello World!"
As you can see, this pipeline will be doing only one thing at the moment: running a "hello world" action which will print "Hello World!" inside the pipeline logs.
Tip: YAML is a file format that is whitespace-sensitive. To make sure that your YAML is properly indented and avoid any error, you can use an online yaml validator like this one: https://jsonformatter.org/yaml-validator.
- Name: specifies the name of the workflow.
- On: specifies an event that will trigger the workflow. This event can be push, pull_request, etc.
- Jobs: specifies the jobs we want to run, in this case our first job is called 'hello-world'.
- Runs-on: specifies the OS we want our workflow to run on.
- Steps: indicate the various steps we want to run on that job.
- Actions: An action is a task or set of procedures that can be executed within a step
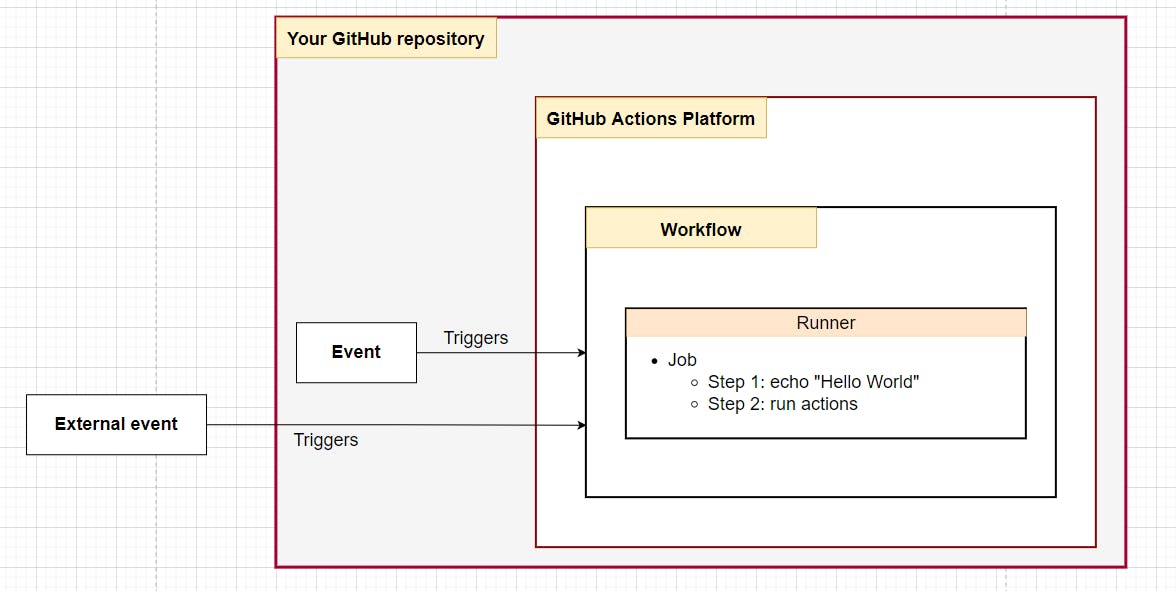
"GitHub Actions consists of 5 core components:
- Event
- Workflow
- Runner
- Job
- Action
How are they related? An event triggers a workflow, which contains multiple jobs. A runner executes a job, and one job can have multiple [steps that contain] actions."
Source: https://hungvu.tech/what-is-github-actions-a-not-so-eli5-introduction-in-2022
Commit and push your changes:
git add .
git commit -m "Create pipeline.yml"
git push
The pipeline should run automatically (because we specified that it should run "on: push").
To see it, open your GitHub repo in the browser, click on the Actions tab, and check the pipeline execution. It should look like this:
- Read the instructions
- Create a folder structure
.github/workflows/where we'll create our first workflow - Create a GitHub workflow called
pipeline.yml - Push the changes and check the pipeline execution in the Actions tab of your GitHub repo in the browser